Tips and Tricks to Use Jupyter Notebooks Effectively
Keyboard shortcuts, code magics, quick documentation, and more!


The Jupyter Notebook is a web-based interactive computing platform, and it is usually the first tool we learn about in data science. Most of us start our learning journeys in Jupyter notebooks. They are great for learning, practicing, and experimenting.
There are several reasons why the Jupyter notebook is a highly popular tool. Here are some of them:
- Being able to see the code and the output together makes it easier to learn and practice.
- It supports Markdown cells which are great for write-ups, preparing reports, and documenting your work.
- In-line outputs including data visualizations are highly useful for exploratory data analysis.
- You can run the code cell-by-cell which expedites the debugging process as well as understanding other people’s code.
Although we quite often use Jupyter notebooks in our work, we do not make the most out of them and fail to discover its full potential. In this article, we will go over some tips and tricks to make more use of Jupyter notebooks. Some of these are shortcuts that can increase your efficiency.
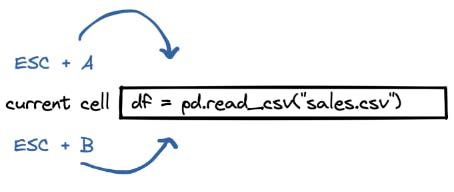
New cell
Creating a new cell is one of the most frequently done operations while working in a Jupyter notebook so a quick way of doing this is very helpful.
- ESC + A creates a new cell above the current cell
- ESC + B creates a new cell below the current cell
Cell output
One of the great features of Jupyter notebooks is that they maintain the state of execution of each cell. In other words, cell outputs are cached. This is very useful because you do not have to execute a cell each time you want to check its output or results.
However, some outputs take too much space and make the overall content hard to follow. We can hide a cell output with “ESC + O” and unhide by pressing these keys again.
If a cell is not needed anymore, you can delete it with “ESC + D + D”.
Magic commands
Magic commands are built-in for the IPython kernel. They are quite useful for performing a variety of tasks. Magic commands start with the “%” syntax element. Here are some examples that will help you get more productive.
# prints the current working directory
%pwd

# change the current working directory
%cd

# list files and folders in the current working directory
%ls

# list files and folders in a specific folder
%ls [path to folder]

# export the current current IPython history to a notebook file
%notebook [filename]

# lists currently available magics
%lsmagic
If you're looking to improve your Jupyter workflow, check out Ploomber's open-source projects: Ploomber for developing modular data pipelines, Soorgeon for refactoring and cleaning), or nbsnapshot for notebook testing.
Multiple outputs
By default, when you execute a cell that returns multiple outputs, only the last output is shown. Here is an example:
mylist = list("programming")
myset = set("programming")

mylist
myset

# output
{'a', 'g', 'i', 'm', 'n', 'o', 'p', 'r'}
It is possible to see all the outputs but we need to change a setting as below:
from IPython.core.interactiveshell import InteractiveShell
InteractiveShell.ast_node_interactivity = "all"
If we execute the code block above, we will see the output of both variables.
mylist = list("programming")
myset = set("programming")

mylist
myset

# output
['p', 'r', 'o', 'g', 'r', 'a', 'm', 'm', 'i', 'n', 'g']
{'a', 'g', 'i', 'm', 'n', 'o', 'p', 'r'}
Shortcuts
There are several shortcuts that you can use in Jupyter notebooks. Here are the ones I find quite useful:
- CTRL + D (⌘ + D in Mac) deletes what is written in the current line.

- ESC + M changes a cell to Markdown.
- ESC + UP or ESC + K selects the cell above.
- ESC + DOWN or ESC + J selects the cell below.
- ESC + SHIFT + M merges selected cells. If only one cell is selected, it is merged with the cell below.
Learning about a function
Python has a rich selection of third party libraries, which simplify tasks and speed up development processes. Those libraries typically have a lot of functions and methods. We sometimes can’t remember what a function does exactly or its syntax.
In such cases, we can learn about the signature and docstring of a function inside the Jupyter notebook. We just need to add ? at the end of the function name. Here is how we can learn about the query function of Pandas library.
import pandas as pd
pd.DataFrame.query?
We have learned about some useful tips and tricks for Jupyter notebooks. You do not have to use all of them immediately but you will see they increase your productivity and efficiency once you start using them.
Questions? Join our growing community of Jupyter practitioners!
Credits
Originally published at ploomber.io by Soner Yildirim, re-shared with permission